
So, you want to transfer your domain name from your current registrar to a new one like GoDaddy? If so, you’ve come to the right place to learn how to.
Now, it’s not complicated to transfer your domain from one registrar to another, but there are a few steps involved. These steps can be broken down into the following categories:
- Preparation steps
- Transfer initiation steps
Preparation steps must be completed before you can move on to the transfer itself. But before we get too far, let’s first talk about why you may need or want to transfer a domain in the first place.
Why transfer a domain to GoDaddy?
Reasons for transferring a domain name from one registrar to another vary. Almost every reason is different for everyone, but in general, it usually boils down to just a few reasons including:
- Your current domain provider isn’t giving you the pricing, support, and/or service you need;
- You want to consolidate all of your domains under a single account;
- Or maybe it’s just simply time for a change.
Whatever the reason for wanting to switch, while moving from one registrar to another might seem like a hassle, it’s actually not difficult if you just follow a few simple steps.
With that being said, you’re probably wondering, “what are the steps?”
So, let’s jump into it.
Prepare for a GoDaddy domain transfer
As mentioned earlier, there two sets of steps to follow in the overall domain transfer process. The first set of steps are related to preparation.
Preparation steps are related to your current domain registrar and involve getting some information that you will need before you can proceed with the transfer initiation steps.
Preparation steps are as follows:
- Unlock your domain name with your current registrar.
- Get an authorization code (also known as an EPP code or transfer key) from your current registrar.
- Verify contact information on your domain name as the admin’s contact info may be used by your current registrar during the domain transfer process.
Now, while these steps will vary just slightly from registrar to registrar, you can usually complete these steps from within the account manager of your current domain registrar account.
In the event you are unable to retrieve the authorization code from within your existing account manager, the next best recommendation is to contact your current registrar directly and ask if they can provide this information to you. Usually they can simply send you an email with your authorization code.
Note: There may be some instances where your transfer doesn’t require an authorization code. An example would be when transferring country-code domain (ccTLDs).
Initiate your transfer
Once you’ve successfully completed the preparation steps by unlocking your domain and getting your authorization code, you’re ready to move on to the actual domain transfer.
But before jumping in, it’s worth noting that some domains are not eligible for transfer yet if they are within 60 days of registration or of a previous transfer. Also, if a customer opted into a 60-day transfer lock after completing a Change of Registrant, this will also affect the eligibility of that domain to be transferred.
With that being said, here are the steps involved to initiate your GoDaddy domain transfer from start to finish.
Time needed: 10 minutes
How to Transfer Your Domain to GoDaddy
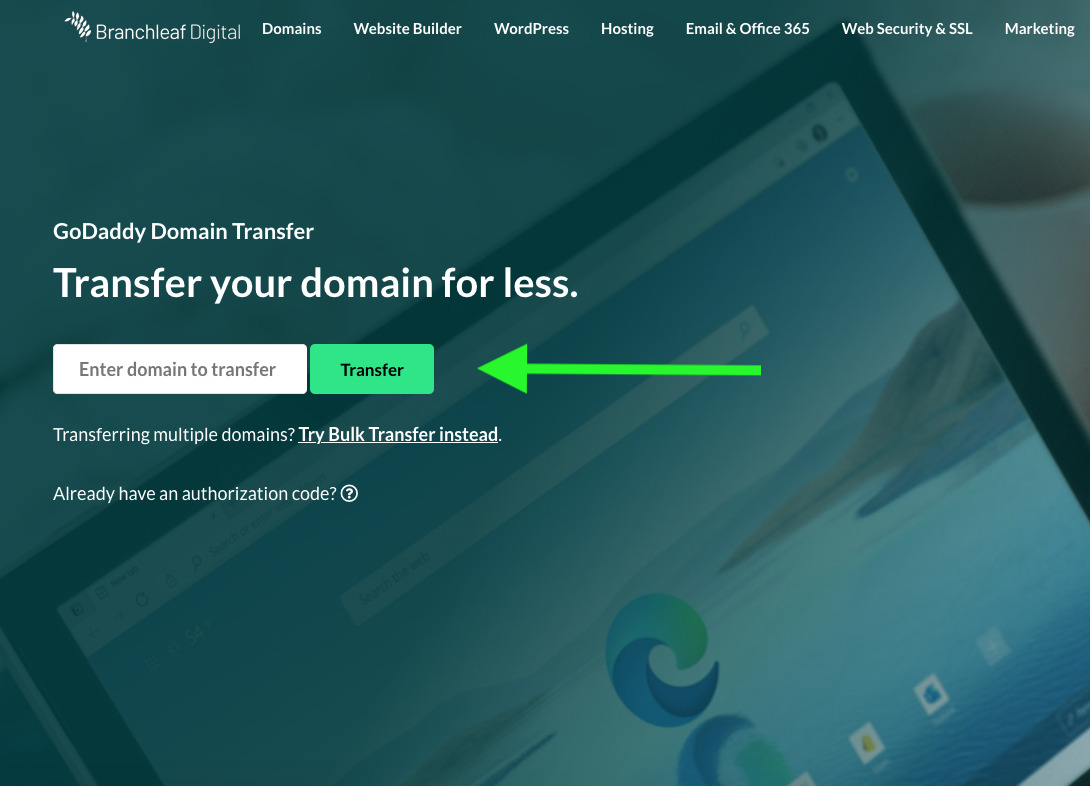
- Enter the domain you want to transfer
Using the GoDaddy domain transfer tool, start by entering the domain name you want to transfer into the field box and select Transfer.
- Confirm your domain is unlocked
Assuming that your domain is already unlocked, you will see a green check mark next to Unlock the domain to confirm. If this section is not green, you will need to verify with your current registrar the unlocked status of your domain name. If it is not unlocked, you will first need to unlock it before proceeding to the next step.

- Enter your authorization code
After confirming that your domain is unlocked, then proceed to enter your authorization code in the second field and choose Continue. If the authorization code entered is valid, you will see a green check mark. If not, then there may be an issue with the authorization code issued to you from your current registrar and may need to confirm with them to retry with a valid authorization code.

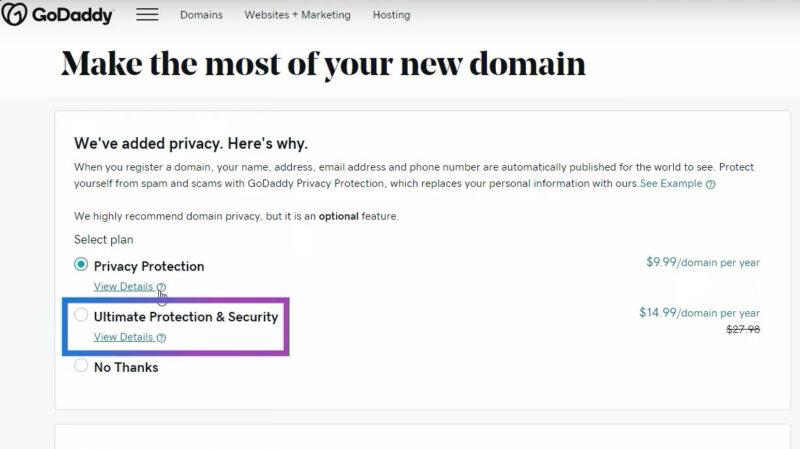
- Select domain privacy options
Next, choose the domain privacy options you want to include with the domain name you are transferring and select Continue. You also have the option of selecting No Thanks if you don’t want to add privacy to your domain.
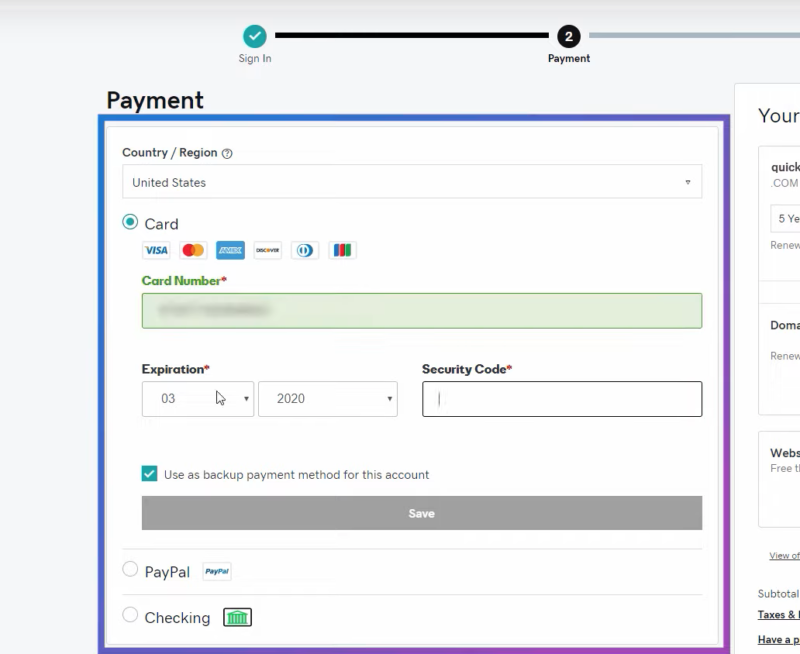
- Complete your purchase
Lastly, select your payment method, and click Complete Purchase to finish the checkout process. Afterward, your GoDaddy domain transfer will have successfully initiated and should complete within 5-7 days.
And that’s it, congratulations. If you followed these steps, you will have successfully completed the initiation to move your domain over from your current registrar.
Note that GoDaddy domain transfers can generally take between 5-7 days to complete. That is to say, the time it takes for the domain to completely move from one registrar to the other.
Questions?
If you followed these steps and have additional questions about the status of a domain transfer, or your transfer is stuck or is returning errors, we encourage you to view these resources:
Leave a Reply
You must be logged in to post a comment.