If you’re not familiar with GoDaddy Webmail, our goal is that you have a solid understanding and foundation by the end of this article. For starters, it’s a great option for individuals and organizations who need to set up a professional email address for either themselves or for their business. Many use the email program when first starting up their business to give their email address a professional look by connecting it to their own domain name.
But, just what is GoDaddy Webmail? And how do I get started and set it up? Those are the questions this article addresses directly. Additionally, this article covers how to login to GoDaddy Webmail once you’ve created an account. It also provides answers to some frequently asked questions about this particular GoDaddy email option.
Ready to learn? Okay, let’s jump in.
Table of Contents
- What is GoDaddy Webmail?
- How does GoDaddy Webmail work?
- How to create a GoDaddy Webmail account
- Add a recovery email address
- How to login to GoDaddy Webmail account
- Add account to your desktop or mobile device
- How do I send an email?
- What else can I do with GoDaddy Webmail after setting it up?
What is GoDaddy Webmail?
GoDaddy Webmail is an email platform used to send and receive email from a web browser as opposed to from an email client. With this method, emails travel over the internet which are then stored directly on various servers.
“What servers?” you might ask. And the answer is multiple servers. Most commonly, webmail can reside on a range of servers belonging to:
- Email providers, such as Gmail
- An ISP, or internet service provider such as AT&T
- Web hosting providers such as GoDaddy
Email is then collected and stored directly on those servers. And generally, it will remain stored on a server until it is deleted by the user of the email account.
How does GoDaddy Webmail work?
Similar to other types of web-based email providers, GoDaddy Webmail works by connecting users to their email accounts by signing in on the web. Once signed in, users can then use email like normal, with the ability to send and receive email from any place or device. When using GoDaddy webmail, users are accessing their email directly from a GoDaddy server which relies on an internet connection to work.
Perhaps the only downside to this is that because your emails are stored on GoDaddy’s server, if for some reason you don’t have an internet connection or the server your email is stored on is down, email would be inaccessible during that time via webmail. Additionally, most webmail options don’t offer quite as much functionality as more elaborate solutions such as Outlook on the Web offered through Microsoft 365 from GoDaddy.
With Microsoft 365 from GoDaddy, you not only have access your email via webmail, but you also have the ability to set it up with an email client such as Outlook or Mail for Mac.
Additionally, with Microsoft 365 webmail, you can access your email account via a personal sign in portal. This is in addition to the standard sign in pages used to access your webmail account. Personal sign in portals follow this format:
- email.yourdomain.tld
So, say for instance, your email domain name is example.com. You could then access your webmail sign in page by visiting email.example.com. Then you could login as normal to access your GoDaddy webmail account.
Okay, so now that we have an understanding of what GoDaddy webmail is and how it works, let’s go over how to get started using the email service.
How to create a GoDaddy Webmail account
In order to set up your GoDaddy Webmail account, you will create an email address within the Workspace Control Center. The Workspace Control Center is located within your customer account.
Here are the steps to set up your email account:
- Sign into your Workspace Control Center (using the username and password for your customer account).
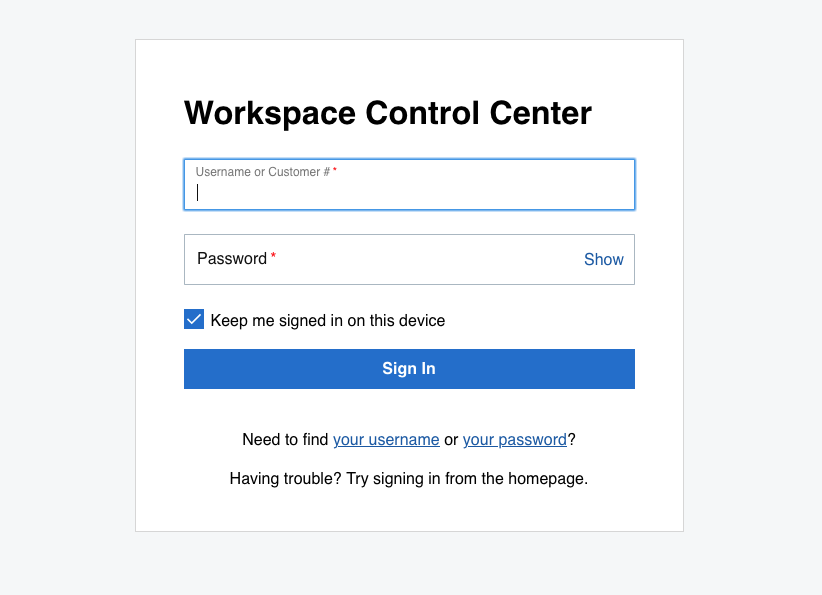
- Once signed in, select the Create option at the top of the Email Address list.

- Select the Email checkbox, then enter the Email Address you want to create with your domain.
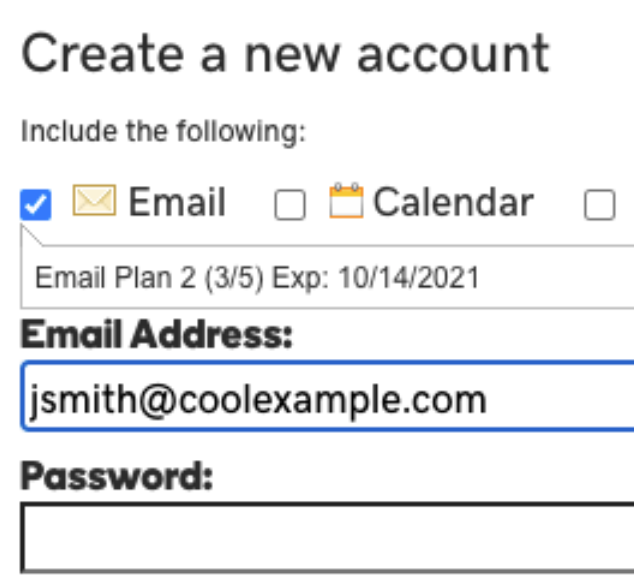
- Enter a Password and confirm it by entering it twice.
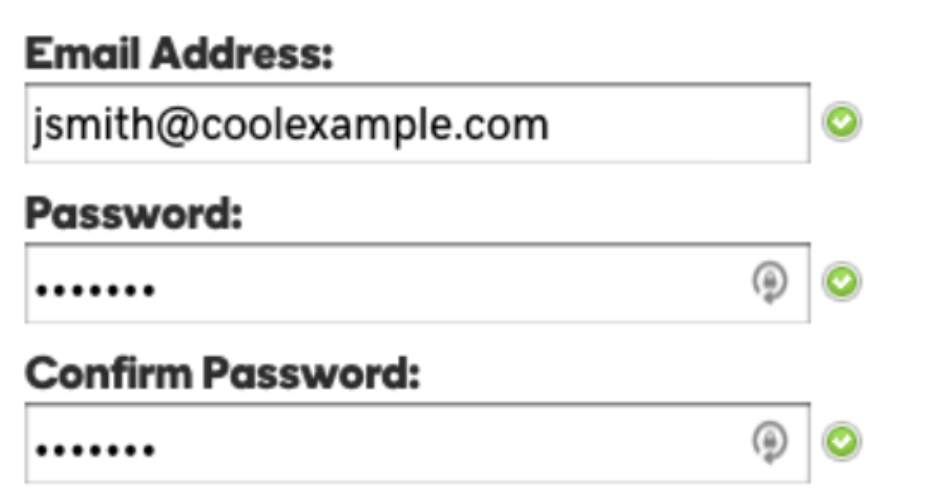
- Lastly, select Create.

And that’s it. It generally takes several minutes for your email account and address to complete the set-up process. Once the set up finishes, you should receive a confirmation email letting you know it has completed.
Add a recovery email address
Now that your GoDaddy Workspace email account has been set up, a highly recommended next step is to add a recovery email address. In the event you ever forget your password, your recovery email address is the email address that a password reset link would be sent to so that you can reset your password to regain access to your account.
New Workspace users are able to add a recovery email address the very first time that they sign into GoDaddy Webmail, as they will be prompted to do so. Existing Workspace users can add or update a recovery email address directly from within the Workspace Control Center.
Here is how to add a recovery email address for both scenarios:
New Workspace Webmail Users
- Visit the GoDaddy Webmail sign in page.
- Sign in using your Workspace email address and password.
- When presented with the Secure your account page, enter a Recovery email address.
- Select Save & Continue.
- Afterward, you will then be taken to your GoDaddy Webmail inbox.
Upon completing these steps, you will be able to reset your password as needed to regain access to your account. If for some reason you don’t receive the prompt to enter a recovery email address when first signing into your account, you may use the instructions for Existing Workspace Email Users below to add a recovery email address.
Existing Workspace Webmail Users
- Visit the Workspace Control Center sign in page.
- Sign in using your customer account username and password (Your Workspace login information will not work here).
- In the Email Address List area, select the Edit icon (which looks like a pencil).
- Enter a Recovery email address.
- Click Save.
And that’s all. By following these steps as an existing or new user, your recovery email address will now be set up and ready for use.
How to login to GoDaddy Webmail account
As we’ve discussed so far, GoDaddy Webmail offers a convenient way for users to access their email from a web browser. And if you’ve successfully created your account, great job. You’re on your way to becoming a real pro.
Next, we’ll go over how to login to your GoDaddy Webmail account. These step-by-step instructions are useful if you want to test that your new email address and password are working correctly, or if you just need a refresher on how to login again if it’s been some time since your last sign in.
Time needed: 1 minute
How to login to GoDaddy Webmail Account
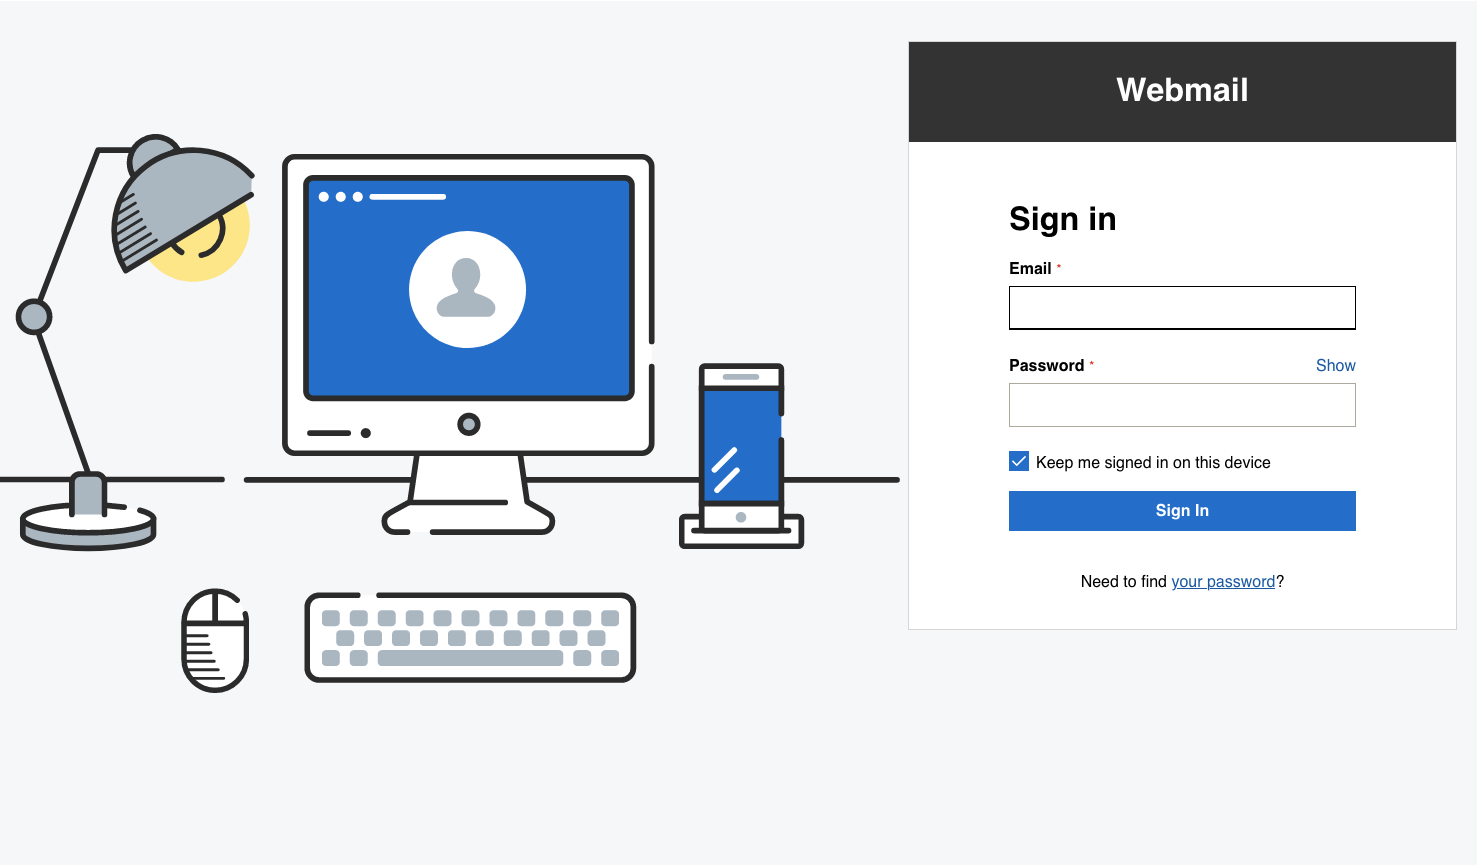
- Visit the GoDaddy Webmail Sign in Page
Start by visiting the GoDaddy Webmail sign in page. It may be a good idea to bookmark this page so it’s easier to get to later.
- Enter your Email Address and Password
In the Email field, enter the email address you set up when first creating your GoDaddy Webmail account. Then, enter the password you created in the Password field.
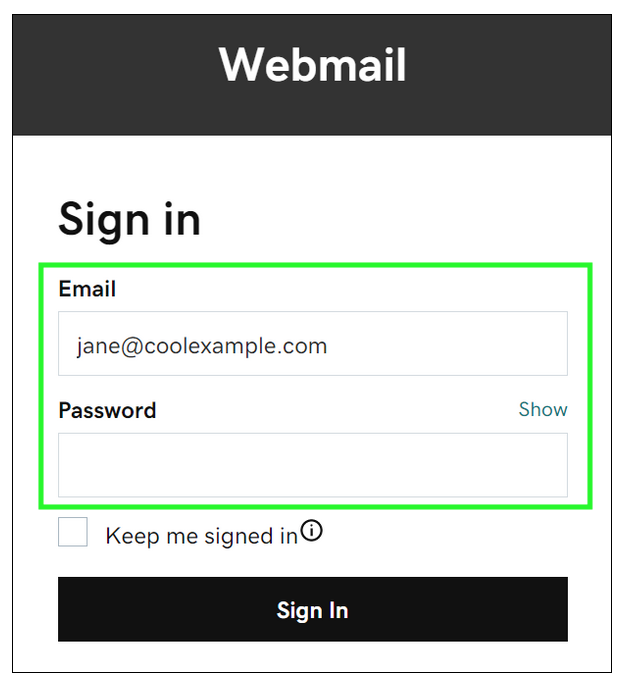
Note: Your customer account email address and password will not work here. - Sign In
After entering your email address and password in the login fields, select Sign In. This will then take you to your GoDaddy Webmail inbox.
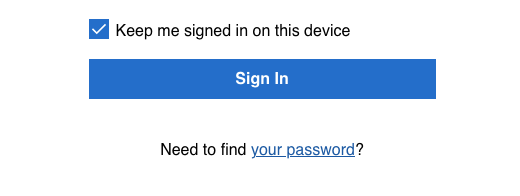
Note: Optionally, you can select the Keep me signed in on this device checkbox if you want to stay signed into Webmail after closing out your web browser.
And there you have it. By following these simple steps, you will have successfully logged into your GoDaddy Webmail account.
So, what’s next? Maybe you’d like to add your email to your desktop or mobile device. You’ll most certainly want to compose an email at some point. These are the topics and questions that are covered in the next few sections as well as how you can troubleshoot some common email roadblocks along the way.
Additionally, we’ll review some other common features such as adding contacts, setting up an email signature, and creating an auto-reply message. So, let’s dive in.
Add GoDaddy Webmail to your desktop or mobile device
Want to add GoDaddy Webmail to your mobile device or desktop? You can. But with so many options for email clients and apps, knowing where to start can seem overwhelming at times. So, this FAQ has you covered on where to begin to find the option that is best for you.
With GoDaddy Webmail you can add your email to Android and iPhone and iPad (iOS) mobile devices.
There are three ways that you can add GoDaddy Webmail to your Android device. The method you use depends on your preference for the app that you want to add your email with to your device. The three apps available to choose from are Outlook on Android, Gmail on Android, and Samsung Email on Android.
Here are the instructions for the three ways to add GoDaddy Webmail to your Android device:
1. Steps to add email to Outlook on Android
2. Steps to add email to Gmail on Android
3. Steps to add email to Samsung Email on Android
There are a couple of ways to add GoDaddy Webmail to your iOS device, such as an iPhone or iPad. You can add email via the Outlook app or through the Apple Mail app. The steps to do so are the same on both devices.
Here are the instructions for each method:
1. Steps to add email to Outlook on iPhone or iPad
2. Steps to add email to Mail app on iPhone or iPad
Yes. With GoDaddy Webmail, you can add your email to both Windows PC’s and Mac computers (macOS).
If you would like to add GoDaddy Webmail to your Windows computer (desktop or laptop), there are two primary ways to do so. You can add your email via the Outlook app for Windows or through the Windows Mail app.
Here are the instructions for each method:
1. Steps to add email via the Windows Mail app
2. Steps to add email to Outlook (Windows app)
To add GoDaddy Webmail to your Mac computer (macOS), there are also two primary methods to do so. Either through the Apple Mail app or with the Outlook app for Mac. Here are the steps for both methods:
1. Steps to add email via the Apple Mail app
2. Steps to add email to Outlook (Mac app)
Yes, you can. If you prefer to use Thunderbird for your email client, you can do so with both Windows and Mac. See add my email to Thunderbird.
No problem. If you get a new phone or computer, you can always refer back to these steps to set up your new device. This also applies if you decide to later switch email apps or email clients from your original setup.
Sometimes you need the server and port settings in order to set up your email on your desktop or mobile device. If so, here are the server and port settings you will need for your email setup.
How do I send an email with GoDaddy Webmail?
Once you have successfully setup your GoDaddy Webmail account, you will undoubtedly want to send an email at some point. As a first step, we recommend sending a test email to yourself once you’ve added GoDaddy Webmail to your device via an app mentioned above.
After going through the instructions to compose and send an email, we’ll also share a couple of tips that may be helpful if you run into some common issues.
Here are the step-by-step instructions to compose and send an email with GoDaddy Webmail:
1. Start by signing into GoDaddy Webmail with your email address and password. (Remember: Use your GoDaddy webmail login information as your customer account login information will not work here.)
2. Once signed in, select Compose to open a new email.
3. In the To: field, enter the email address you want to send an email to.
4. In the Subject: field, enter the subject line of your email.
5. In the body section, enter the message of your email.
6. When ready, click Send.
That’s it. By following these steps, you will have successfully composed and sent an email with GoDaddy Webmail.
In certain instances, sent mail cannot be delivered for various reasons. When this happens, you receive an error message explaining why the email could not be delivered. This error message is also referred to as a bounce back message. With that being said, there are several reasons why you might receive a bounce back message after trying to send an email. In the event you receive a bounce back message, see What does my email bounce mean? This will provide troubleshooting guidance to fix the issue based on the error message you get back.
If you are experiencing other email issues, such as not being able to send or receive email, then there may have been an issue with the initial email set up process. If so, please contact customer support to further troubleshoot the problem and resolve the issue.
What else can I do with GoDaddy Webmail after setting it up?
If you’ve made it this far in your GoDaddy Webmail journey, congratulations. You are off to a great start and now have a solid foundation to work from. And now that you’re all set up and good to go, you may be wondering what other things you can do to make the most of your account. If so, that’s great.
Here are a few more things you may want to set up now that you’re on a roll.
You may want to add your contacts in GoDaddy Webmail so that you can easily manage contact information such as email addresses, mailing addresses, or even phone numbers from people you regularly contact. Fortunately, there is a very easy way to do this using the built-in address book. Learn how to add and manage contacts in GoDaddy Webmail.
Sometimes you may want to send email to the same groups of people in a convenient way without having to type everyone’s email address in each time. To do this, you may consider creating a distribution list which lets you easily email groups of contacts all at once. Doing so eliminates the need to add individual recipients each time you need to email the same group of people.
Yes, you can. With GoDaddy Webmail, you can set up a group calendar, as well as invite other users to set up and activate their account.
Email signatures are a great way to enhance the professionalism of your email. By adding your name, job title, phone number, and website to an email signature, every email you compose can automatically display this information at the end of email messages that you write. Nice. Rather add in your email signature manually? You have that option as well. See add my email signature to GoDaddy Webmail to learn how.
Setting up an auto-reply message is especially helpful when you are going to be unavailable for a specified period of time, or when going on vacation. Sometimes referred to as an “out of office message,” auto-reply messages let the people who send you email know that you are temporarily unavailable and also how they can reach immediate assistance elsewhere if they need it. Having an auto-reply enabled is a professional courtesy to colleagues and other people who may need to reach you by email. See set up auto-reply in GoDaddy Webmail to learn how to create one for yourself if need be.
Wrap-up
Well, that about covers it. Hopefully after reading this article, you have a much better idea of how to get started and set up with GoDaddy Webmail. And of course, you can always refer back to this article if you ever need help along the way, or just need a brief refresher.
Additionally, you may want to also visit our Help Center for more instruction and tutorials on the topic of email.
Have another question that wasn’t answered in this article? Let us know in the comments.


Leave a Reply
You must be logged in to post a comment.